
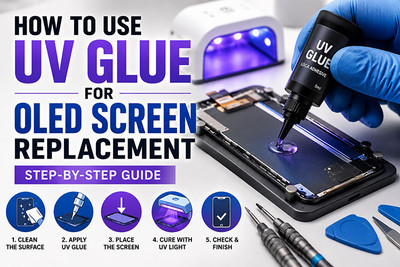
How to Use UV Glue for OLED Screen Replacement: Complete DIY Guide
Replacing an OLED screen is one of the most rewarding smartphone repairs—but it's also one of the easiest to get wrong.
Even with a premium replacement display, poor adhesive application can lead to air bubbles, light leakage, weak bonding, reduced touch sensitivity, or even permanent screen damage.
That's why many professional repair technicians use UV-curable optical adhesive (LOCA) for certain OLED display repairs. When applied correctly, UV glue creates a strong, transparent bond that helps maintain excellent display clarity. This guide will walk you through everything you need to know before you start repait an OLED screen.
What Is UV Glue?
UV glue, also known as LOCA (Liquid Optically Clear Adhesive), is a transparent adhesive that remains liquid until exposed to ultraviolet light.
Once cured, it becomes:
- Crystal clear
- Highly durable
- Flexible
- Resistant to heat and moisture
Its primary purpose is to bond glass and display layers while maintaining excellent optical clarity.
Why LOCA Matters for OLED Screens
OLED displays are manufactured with the glass optically bonded to the display panel using LOCA . This bonding serves critical purposes:
The critical distinction: Using regular adhesive (like B7000) around the edges for glass replacement will result in an ugly, dysfunctional touch screen. It may work temporarily but will eventually fail . For optical bonding, you must use LOCA.
Tools You'll Need
Prepare everything before beginning:
✅UV glue (LOCA adhesive)
✅UV curing lamp (365–405 nm)
✅Microfiber cloth
✅Isopropyl alcohol (90% or higher)
✅Plastic opening tools
✅Precision screwdrivers
✅Nitrile gloves
✅Dust removal stickers
✅Plastic scraper or card
✅Replacement OLED screen
A clean, dust-free workspace is just as important as the tools themselves.
Step 1: Remove the Old Display
Carefully disassemble the phone according to the manufacturer's repair procedure.
Before applying any adhesive:
- Remove all old glue
- Clean away dust
- Remove fingerprints
- Ensure the frame is perfectly flat
Any debris trapped beneath the display can create visible bumps or pressure points.
Step 2: Test the New OLED Screen
Before using any adhesive:
- Connect the replacement screen
- Power on the device
- Check:
-
- Display brightness
- Touch sensitivity
- Colors
- Face ID/Fingerprint functions (if applicable)
- Dead pixels
- Flickering
Testing first can save time if the replacement screen has a defect.
Step 3: Clean the Surface
Use isopropyl alcohol and a lint-free microfiber cloth to clean:
- The display frame
- The replacement panel (if appropriate)
- The glass contact area
The surface must be completely dry before proceeding.
Step 4: Apply UV Glue Correctly
This is where many DIY repairs go wrong.
Apply only a small amount.
Place a controlled bead of UV glue in the center of the display area (or follow the adhesive pattern recommended for your repair).
Avoid:
- Applying glue near the earpiece speaker
- Covering sensors or cameras
- Using excessive glue
Too much adhesive can overflow into:
- Front camera
- Proximity sensor
- Buttons
- Speaker mesh
- Charging port
Step 5: Install the OLED Screen
Lower the screen slowly.
Do not press immediately.
Allow the glue to spread naturally as the display settles into position.
If necessary, apply gentle, even pressure using a microfiber cloth.
Never force the display into place.
Step 6: Check for Air Bubbles
Before curing:
Inspect from multiple angles.
Small bubbles often disappear naturally.
If large bubbles remain:
- Lift the display carefully (if appropriate)
- Reposition it
- Allow the adhesive to redistribute
Do not cure the glue until you're satisfied with the result.
Step 7: Cure the Adhesive
Use a UV curing lamp according to the adhesive manufacturer's instructions.
Generally:
- Cure one section at a time
- Rotate the phone if needed
- Ensure even UV exposure
Avoid overheating the display during curing.
Step 8: Final Inspection
After curing:
Check for:
- Proper display alignment
- Uniform brightness
- Full touch functionality
- Dust under the glass
- Glue overflow
- Camera clarity
- Speaker performance
Only reassemble the phone after confirming everything works correctly.
Common Mistakes to Avoid
1. Using Too Much Glue
Excess adhesive can seep into sensitive components and may be difficult—or impossible—to remove.
2. Skipping the Screen Test
Always test the display before applying adhesive.
Replacing a defective screen is much easier before it's bonded.
3. Curing Too Early
If the screen isn't perfectly aligned, curing the glue immediately can lock in the mistake.
4. Working in a Dusty Environment
Dust particles become highly visible once trapped beneath the display.
Cleanliness is critical.
Safety Tips
- Wear gloves when handling adhesive.
- Avoid skin and eye contact.
- Use UV lamps responsibly—do not look directly into the light.
- Work in a well-ventilated area.
Always follow the adhesive manufacturer's safety instructions.
Comparison: UV Glue vs. Other Adhesives
Frequently Asked Questions
Can I use super glue instead of UV glue?
No.
Super glue is not optically clear, becomes brittle, and can permanently damage a display.
Does every OLED screen replacement require UV glue?
No.
Many replacement display assemblies use pre-cut adhesive or factory-installed adhesive instead.
Always verify the installation method for your specific device.
Can UV glue improve touch sensitivity?
When used appropriately in repairs that call for LOCA, it helps create a clear bond between layers. However, touch performance also depends on screen quality, correct installation, and device compatibility.
Final Thoughts
Using UV glue for an OLED screen replacement requires patience, precision, and the right materials. While it can produce a clean, professional-looking result in repairs designed for LOCA adhesive, it's not a universal solution for every phone model or every replacement screen.
The best results come from:
- Using a compatible replacement screen
- Following the recommended adhesive method
- Testing before bonding
- Working in a clean environment
- Taking your time with alignment and curing
A careful installation doesn't just improve the appearance of the repair—it also helps ensure reliable touch performance and long-lasting durability.
Recent Posts
-
30-Second Fix: How to Clean a Clogged Speaker Grill
Your phone's speaker used to be loud and clear. Now it sounds muffled, distorted, or barely audible. …Sep 10, 2026 -
How to Use UV Glue for OLED Screen Replacement: Complete DIY Guide
Replacing an OLED screen is one of the most rewarding smartphone repairs—but it's also one of the ea …Jul 17, 2026 -
Dead Pixels on Phone Screen: Can You Fix Them?
Have you noticed a tiny black dot on your phone screen that never changes color—no matter what app y …Jun 25, 2026